I sold my Aerophone in Jan 2021, so there will be no further updates to this.
Updated 15 Sept 2020
I have previously written about the AE-10’s mouthpiece settings, but the subsequent firmware updates have changed and simplified these settings. The change to 3.10 simplified the reed action, and the 3.11 update fixed some bugs, including the “trigger” settings for the note-ons. These have been updated below. The following is a summary of the settings I needed to understand to get the instrument to work with an external synth. Note that settings here apply to MY instrument, and may have to be adjusted for yours…
Internal and External synths
The AE10 has its own internal synth, which produces audio out the 1/4″ audio port, but the instrument can also be used to feed an external synth, driving it via MIDI commands out the USB port. I have used a special tone (user preset) to save the settings for MIDI out. It doesn’t have to be that way, but I prefer it, as it means that any settings on that tone apply only to the MIDI out, rather than the internal synth. That said, there are very few settings on the menu that apply to both internal and external output.
Which Settings are used?
The output to the MIDI port is controlled by the following settings that are found on the INSTRUMENT menu, not the EDITOR (tablet app) menu:
- Breath. (SYSTEM). This controls how much breath pressure is needed to get volume. The settings from low to high are L3, L2, L1, M, H1, H2, H3. Adjusting this setting adjusts the breath/volume response for both the internal and external synth. If you are switching back and forth between internal and external synths you may have to adjust this each time you switch.
- BreatAdj. (SYSTEM). This controls the threshold for starting notes. It can be set to AUTO, or 1-100. Adjusting this setting adjusts the breath/volume response for both the internal and external synth. If you are switching back and forth between internal and external synths you may have to adjust this each time you switch.
- BreaOut1, BreaOut2. (SYSTEM, EXT). These settings select which CC commands are sent to the external synth as a result of breath pressure. You can choose from a large range, but the most common is CC2
- BiteOut1, BiteOut2 (SYSTEM, EXT). These select which CC commands are sent to the external synth as a result of bite pressure. BND.S and BND.E are commonly used
- BiteMin1, BiteMin2, BiteMax1, BiteMax2 (SYSTEM, EXT). The min/max values of the CC that are sent (0-127)
- BiteOfst (SYSTEM). This sets the trigger point for the bite function to start. See discussion below.
- Left Asn, Right Asn (TONE, EXT). These set the CC commands that are sent with the Left/Right joystick
- Left Min, Left Max, RightMin, RightMax, (TONE, EXT). These set the min/max values of the CC that are sent (0-127)
- Bend Rng (TONE). This sets the maximum value of bend. see discussion below.
- Bend Sw (TONE). Turns on or off the joystick pitch bend function (up/down movement)
Note that the ones marked as SYSTEM settings mean that once you set them, they apply to every tone you load. The ones marked TONE can be set for each tone. The ones marked EXT apply to ONLY the external synth output.
The BiteCtrl and EwndSens settings are used only for the internal synth, and are ignored for the external output.
Breath
The breath settings behave slightly differently when using an external synth than they do with the internal synth. I don’t know what happens with the internal synth, but the results are different when an external synth is used.
To start a note on the external synth, typically the CC2 breath commands start immediately you start blowing, then around 20msec after the CC2 start the instrument sends a NOTEON command. This delay is needed (I believe) to enable the breath pressure to stabilise enough to send a useful value for velocity, telling the synth how hard to attack the note. Typically, the velocity is the current value of the CC2 at that time. You can only get this information after the breath pressure has risen – hence the 20msec delay. A NOTEOFF is sent when the CC2s return to zero (when you stop blowing).
The AE10 seems to use a different method. It sends a NOTEON after the CC2s reach a peak above a “Trigger” CC2 value, and a NOTEOFF immediately the CC2s fall below the trigger. The velocity value sent is the CC2 value at that peak value. If the peak is not above the trigger, no noteon will be sent. The time between starting blowing and sending the noteon seems to be around 3 to 5msec. This is very fast.
Another complication is that the trigger values depend on what setting you have for Breath and BreatAdj.
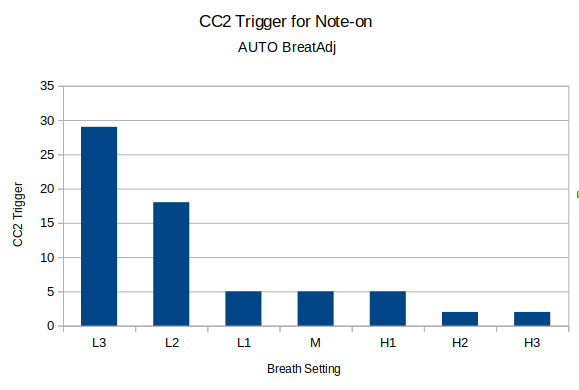
The above graph shows the values of the trigger CC2 using the AUTO setting of BreatAdj. The effect of these trigger values is that if you are trying to hold a low volume around the values of these triggers (eg around 18 with the L2 setting) the instrument will send a string of NOTEONs and NOTEOFFs, causing the sound to “stammer”. With the L2 and L3 settings you have effectively lost some part of your dynamic range (max 127). These are the values for the 3.11 firmware. They were significantly higher for the previous version, and now this is less of a problem.
To work around this issue, you can change the setting of the BreatAdj, and this is what happens:
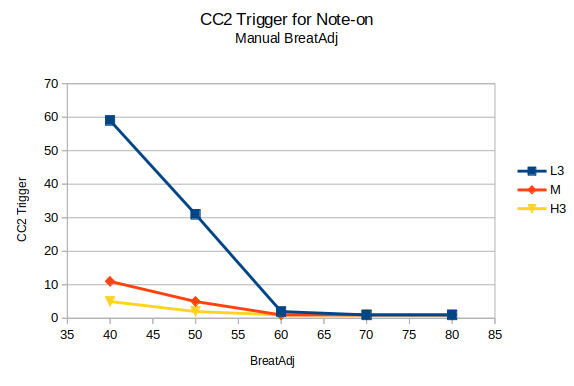
The above graph shows that, as you increase the threshold value of BreatAdj, the trigger value decreases. For me, a trigger value of 1 or 2 is acceptable, otherwise you get the “stammering” effect at low volume. If, however, you don’t want the note to start unless you are breathing a bit more strongly, then a lower value of BreathAdj (and a higher trigger) is appropriate.
So, my procedure for setting the breath controls is
- First, decide on what Breath setting you want to give the volume response you need. i.e. L3, L2, L1, M, H1, H2, H3 .
- Then adjust the BreatAdj setting to give the trigger that you are comfortable with. For me and my instrument, that means a BreatAdj setting above 60 (a trigger value of 1 or 2).
Pitch Bend
Pitch Bend is normally send via a) the joystick and/or b) bite control. The maximum allowable MIDI range of bend is -8192 to +8191, and this is configured by the Bend Rng setting. The setting goes from 1-12, and the manual implies that this is 1-12 semitones. In fact, it works this way: if Bend Rng is set to 2 then the MIDI range is 8192/2 = 4096. Therefore a setting of 1 gives the full MIDI range and a setting of 12 gives the smallest range.
The joystick bend (up/down movement) is either on or off, using the Bend Sw and uses the full MIDI pitchbend (-8192 to +8191).
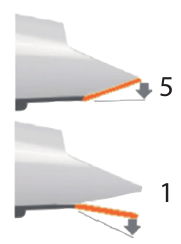
To use bite control, you need to set the BiteOut1 (or BiteOut2) to “BND.S”. Note that this is ONLY downward pitch bend. If you want to bend up you will have to use the joystick. The physical distance moved by the reed to obtain bite bend is very small (see my previous discussion of the mouthpiece function), and, over that small distance, the bend goes from a MIDI zero to the maximum set by Bend Rng. The start position of the bend can be adjusted by the BiteOfst using a range of 1-5 as shown (in orange) in this diagram from the Roland manual:
A special note here: If you set one of the BiteOuts to “BND.S” you cannot switch off the bite bend by changing to another tone, because those settings are locked in as “SYSTEM” settings. The only quick way I have found to do it (adjusting just the instrument, not the synth) is to set up another user tone with Bend Rng set to 12 (the smallest bend possible). Of course, the correct way to do this is to set the preset on the external synth to not react to pitch bend. Note also: When you use the Tone Selection Button to change tones the AE-10 will send out a Pitchbend=0 command so that the new tone (with a possibly different Bend Rng) starts with a “clean slate”
Vibrato
Vibrato can be easily applied using the “BND.E” setting for one of the BiteOuts. The vibrato occurs when you cyclically vary the bite strength on the reed. This function uses pitch bend to provide ONLY downwards vibrato. The strength of the vibrato is controlled by the Bend Rng setting, and the position of the start of the vibrato function is controlled by the BendOfst, in the same way that the simple pitch bend is controlled.
If you want any other sort of vibrato, then you will have to use whatever functions your external synth may have. You will need to configure the AE-10 to provide the appropriate CCs, using the settings above.
Silencing the Audio
If you are using a special preset for external synth work, and you don’t want audio to come out the AE-10 audio port, there are a few solutions. I prefer the last one:
- Plug a dummy adapter into the audio port
- Turn the internal speaker off
- Adjust the Tone Vol to zero for your external synth preset
- Open the tablet app editor, select your external synth preset, and switch off the active part (thanks to Kobi Rivlin for this)
I hope this information helps others….
Update History
15 Sept 2020 – Corrected graphs and explanation for Breath section
28 March 2020 – Updated for the 3.11 firmware
10 Jan 2020 – added Breath section
8 Jan 2020 – added to Silencing the Audio
29 Dec 2019 – changed formatting, added Kobi Rivlin contribution
27 Dec 2019 – original document