Oct 2015
I have recently taken up coffee roasting. I’ve always liked a nice espresso, and so, encouraged by the efforts of others at coffeesnobs.com.au (a nice bunch of coffee fanatics), I’ve built a computer-controlled roaster. Of course, it’s based on a Raspberry-Pi!
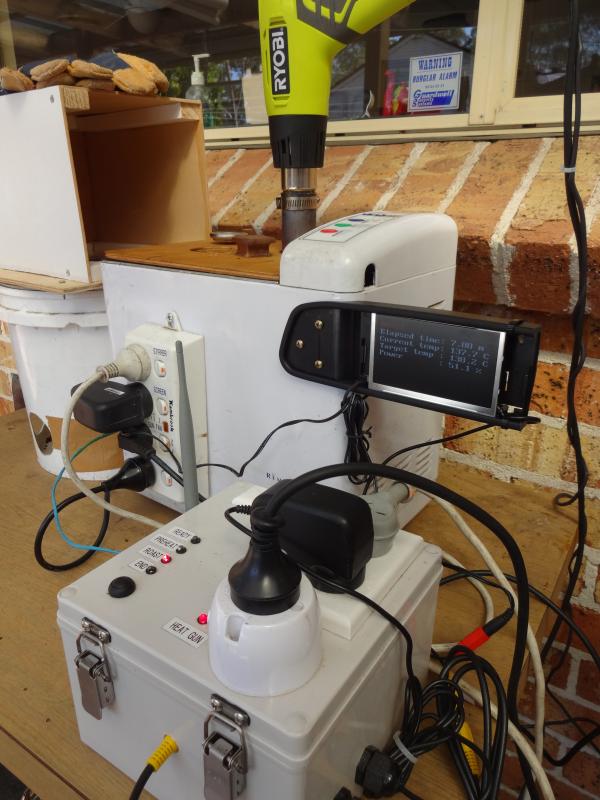
It looks like this:
The internals look like this:
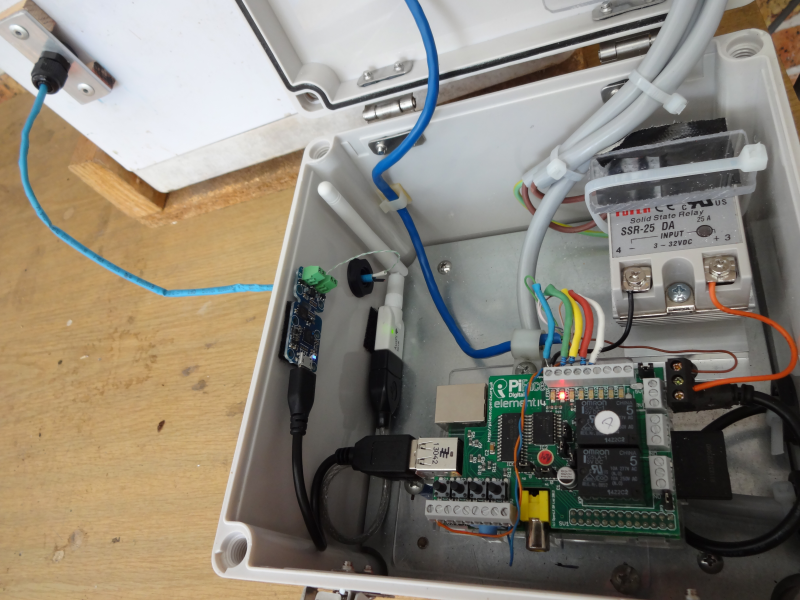
The components are:
- A Remington “Big Loaf” breadmaker
- A Ryobi 2000W heat gun
- A Raspberry-Pi B model, running Raspbian linux
- A PiFace digital I/O card
- A Fotek solid state relay
- A Yocto-thermocouple
- A WiFi dongle
- A program written in python
- An old exhaust fan mounted in a plastic bucket with a steamer insert as a bean cooler
- A reversing camera video screen
The configuration and monitoring of the roast is done via a web interface that looks like:

The meaning of the various configuration options is explained in the Details section below.
Sequence of events
- The unit is turned on and the configuration is adjusted as necessary.
- The “advance” button is pressed to enter the Preheat phase, and the heatgun is pulsed at the preheat power% until the preheat temperature is reached. The temperature will hold at that level.
- The beans are then loaded, and the advance button pressed to enter the Roast phase
- The heatgun power holds at the Start Power for the Start Time (sec). It’s a power-pulse to bring the beans up to temperature quickly.
- The roaster then follows a time/temperature profile until the roast is complete (the Roast Time has been reached). The details of the roast are recorded as it proceeds.
- The system then automatically advances to the End phase and the heat gun is turned off.
- At this point the operator must transfer the beans to the bean cooler.
Details
Temperature Control
The roast temperature profile is held in a text file, which gives the key points. The system then interpolates between these points. The profile is:
| 0,50 2,90 4,117 6, 141 8, 161 10, 179 12, 192 14, 203 16, 210 18, 213 20, 215 30,0 |
The system looks ahead 75 seconds to see where the temperature should be at that time, and works out how much power to feed in to get that result. The power needed is in two parts – a) the power required to raise the system from the current temperature to to “look ahead” temperature (this is determined by K1), and b) the power needed to hold the current temperature (this is determined by K2). K1 and K2 have been determined by experiment, and will apply to THIS roaster only. Why 75 seconds? Again, this was found by experiment.
The temperature is measured by the Yocto-thermocouple. Yocto supply drivers for whatever operating system and whatever programming language you use. The temperature reading is smoothed using a smoothing coefficient. The higher the coefficient, the more rapidly the temperature adjusts, but the less smooth it is.
Temperature Profile Adjustment
To change the shape of the target temperature profile, adjusting the values in the text file is required. However, to change the final temperature and/or the total roast time, all that is needed is to change the values on the configuration screen. The time/temperature values in the profile will be scaled accordingly. In a similar way, changing the mass of beans on the configuration screen will change the value of K1 in proportion.
Hot Air Gun
The Ryobi hot air gun has had its fan wiring separated from its heating coil wiring, so that the fan runs flat out all the time (on a separate ~19VDC power supply), and the heating power can be pulsed on and off by the Fotek SSR. The heating cycle is 2 seconds, so for 75% power it is on for 1.5 seconds and off for 0.5 seconds. There is a separate background python program that runs the pulse-width-modulation of the SSR/heatgun.
IMPORTANT NOTE: you must make sure that the fan is never off when the heating element power is on, or a fire is likely.
Breadmaker
I have removed all the electronics from the breadmaker, and have left only the motor drive components, so the stirrer runs continuously. Also, I have added an extension to the paddle, so the coffee beans are more strongly agitated. I have removed the original lid and replaced it with a particleboard cover with holes for the heat gun and for the exhaust air.
Files
My files are available here:
and here’s what they all do:
| Filename | Directory | Function |
|---|---|---|
| roaster.py | /home/pi/roaster | Main python script that controls the roaster |
| roaster-pwm.py | /home/pi/roaster | Pulse-width-modulation script that runs the SSR |
| profile.txt | /home/pi/roaster | Target temperature profile. Read by roaster.py |
| pwm.txt | /home/pi/roaster | Text file with pwm setting. Written by roaster.py and read by roaster-pwm.py |
| roaster.txt | /home/pi/roaster | Text file with time/temp readings. Read by roaster.php |
| index.html | /var/www | Web file that sets up frames for the web pages |
| roaster.php | /var/www | Temperature graph. Uses Google graphs |
| roaster-config.php | /var/www | Configuration web page |
| rconfighandler.php | /var/www | Handler script that processes the data posted in the roaster-config.php page |
| k1.txt | /var/www/control | Store for K1. Written by rconfighandler.php |
| k2.txt | /var/www/control | Store for K2. Written by rconfighandler.php |
| alpha.txt | /var/www/control | Store for smoothing coefficient. Written by rconfighandler.php |
| comments.txt | /var/www/control | Store for graph comments. Written by rconfighandler.php |
| prepower.txt | /var/www/control | Store for preheat power. Written by rconfighandler.php |
| pretemp.txt | /var/www/control | Store for preheat temp. Written by rconfighandler.php |
| startpower.txt | /var/www/control | Store for start power. Written by rconfighandler.php |
| starttime.txt | /var/www/control | Store for start time. Written by rconfighandler.php |
| peaktemp.txt | /var/www/control | Store for peak temp. Written by rconfighandler.php |
| roasttime.txt | /var/www/control | Store for roast time. Written by rconfighandler.php |
| beanmass.txt | /var/www/control | Store for bean mass. Written by rconfighandler.php |