Updated 15 May 2022
As of May 2023 I have sold this instrument, but my review is still valid.
In April ’22 I bought a Roland Aerophone AE-20. It’s the slightly simplified version of the “Pro” AE-30. The AE-30 features I don’t have are the DIN MIDI plugs, the movement sensor, some memory storage, and some other things that I thought I could do without. I saved about AUD500. Nevertheless, it is still a very impressive instrument!
On this page I will talk about the pros and cons of the instrument. These are the things that I would have liked to have known about before buying it, but like all of these situations, you actually have to experience the product to appreciate its subtleties. As you see on my other pages on this site, I have owned a couple of AKAI Pro EWI models, an Aerophone AE-10, and other self-built wind controllers, so I will be regularly comparing the AE-20 to those. This is an on-going evaluation, and I will be updating it as I learn more.
Look, Feel and Features

The instrument looks like this (thanks Roland for your photo). It’s about the same size and weight as the previous AE-10. It feels very similar to the AE-10.
It comes with a “Band” to put around the neck to stop condensation from running down the neck and onto the keys. I didn’t think I needed to use the band, but I do. A word of warning: picking up the AE-20 by the neck (where the band is) usually means you’re about to drop the instrument. It’s slippery.
A neck strap is included, but I don’t like it as it is quite narrow and tends to cut into my neck. So, as with the AE-10, I’m using a sax strap. The problem then is that the distance between the mouthpiece and the strap hook is quite short, and the sax straps I have don’t like to shorten themselves that much.
Bluetooth is built-in, and it has Bluetooth audio (in) and BLE MIDI (out and in). I didn’t think I would use these features much, but I found that the BLE MIDI in was really useful in compensating for a shortcoming in quick selection of scenes (presets) – see below. The audio in is useful for playing with backing tracks – the combined audio comes out the speakers or headphones.
The on-board speakers are fine for checking that the instrument is working, or maybe quiet rehearsal (the sound quality is not great), but a drawback is that connecting a 1/4″ stereo audio out plug does not automatically cut out the on-board speakers (you could do that on the AE-10). You have to manually turn them off. Plugging in headphones (separate socket) can be set up to automatically cut out the speakers.
I’ve had the (nickel metal hydride) batteries last for 5 hours’ on-and-off playing, and I only changed the batteries then because they were on the last “bar”. They perform well. If you need to buy a charger I’d suggest getting a six-battery one so you can charge all the batteries at the one time.
The Roland-supplied case is good. It’s padded well enough to protect the instrument, and there is sufficient pocket-room for extras. The Velcro strips for securing the instrument annoyingly stick to the insides of the case.
Keys and Fingering
The keys on the AE-10 were clicky, and many users hated them. The ones on the AE-20 don’t click. If you slap your fingers on them they make a noise when they bottom out, but pressing them gently is silent. The downside of this is that you have no tactile feedback, and if you unconsciously release your finger pressure, the note changes suddenly. It’s not a big issue, and it’s one I’m sure I’ll just get used to.
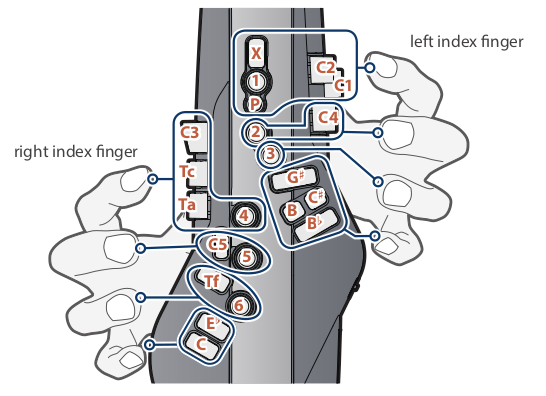
I use EWI E-Wind fingering, which is optimised for efficiency of movement. That said, the E-wind fingering versions on the various commercial wind controllers are not identical, so you need to be able to re-program the keys to change the fingering to what you prefer (User Fingering). Like the AE-10, the AE-20 has this feature.
I have standardised on the E-wind fingering that the EWI-USB uses, and I adjust all my other instruments to be the same as that. I don’t use keys X, C1, C2, C3, C4, C5, B, Tc and Tf (see diagram above). In addition to the User Fingering feature above, there is a Key Function feature that allows you to change what any of the performance keys does, including turning them off. This is a really great feature which the AE-10 didn’t have. It allows you to get the exact fingering you want, and if you accidentally touch one of the “extra” keys on the aforementioned list, nothing happens. For me, this is particularly important for key Tf, which is easily touched when pressing key 6.
On any wind controller the thumb octave keys (No. 6 above) are always the most difficult keys to master, and this instrument is no different. It took me a long time to get used to the ones on the AE-10, but I think these will be quicker. The one-octave-up and one-octave-down keys seem to travel further before they work than the ones on the AE-10, and I’m experiencing some difficulty hitting them reliably on change of octave. I assume that will pass as I get used to it.
Actually, now I’m talking about it, there seems to be quite a variation of how much travel of the keys is needed to get them to work. Some, like the octave keys mentioned above, take quite a bit, and others, like the annoying Tf key, require almost no movement to make them work. What this is saying is that you really need to be firm and positive with your fingering (like an acoustic sax). I still prefer the touch-sensitive keys on the EWI series.
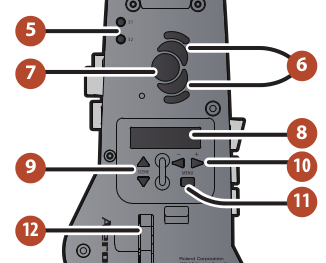
Getting to the thumb lever (No. 12 above) was difficult on the AE-10 for me (I have smallish hands), and I was hoping for it to be easier on the AE-20. I’ve found it to be marginally better, and the lever is a better design too. However, I think the EWI design for the right thumb bend control is better.
Sounds
You can never tell what these instruments sound like until you get one. The YouTube demos are OK, but it’s nothing like playing the instrument. I use orchestral sounds (typically the SuperNatural ones) as I play in a concert band, and I don’t use the synthy ones much. I’ll go out on a limb here and compare the sounds from synths I have used. This is my opinion comparing the flute, oboe, clarinet, sax, trumpet and trombone sounds that I use most:
- XpressO – overall the best sounds, with the ability to tweak them if you have the skills. If sound quality is important for a performance, then I’ll choose the XO.
- AE-20 – almost as good as the XO. I think the sax sounds are better than the XO, but there’s not much in it.
- EWI Solo – The flute was disappointing. Others were OK, but not outstanding. There is limited ability to tweak.
- Roland JV1010 with Patchman soundbank – The flute sound is the best of anything here! The trombone is excellent. The sax sounds are ordinary.
Why is it that Roland seem to think that high levels of reverb sounds great? All the factory preset scenes I have tried have much higher reverb that I think sounds good. Maybe it’s just me? I run at about setting 32 (usually 64 is the default).
Mouthpiece
The Aerophone mouthpiece bite is (IMHO) one of its stand-out features. For someone from a sax/clarinet background, it works much better than the EWI style bite mechanism. The AE-10 device had a few design problems, but the one on the AE-20 (which, I think, it shares with the AE-05 and AE-30) is much better built. The mouthpiece seals against the body more rigidly, and the reed sensing finger is more robustly mounted and better positioned near the tip of the reed. The manual doesn’t suggest using (sax-type) joint grease when installing the mouthpiece, but I think it is a good idea.
Bite Settings
Here I’m going to talk about bite down creating pitchbend down, but the same approach applies for bite up and for effects other than pitchbend.
Initially I had some difficulty working out how to set up the bite sensor, but Alistair Parnell’s video helped a lot. The video enables you to set up the “Bite Center” position for the reed. A centre position of ‘1’ is the fully open position, and ’70’ is fully closed. You’ll want a centre position somewhere in-between. If you like having a hard bite, or if you bite near the tip of the reed, then you’ll need a higher number setting.
There’s a short-cut to setting the Bite Center – you bite like you normally do, play a note, and while the note is playing you press the UP2-Octave and DOWN2-Octave thumb keys at the same time. When you’ve done that go to Bite Center and see what number you get. In my case I got 1. This was the reason for my initial problem with setting the bite sensor. The mechanism that detects the bite position wasn’t able to detect my normal bite position. I fixed that by bending the lever in a vyse:
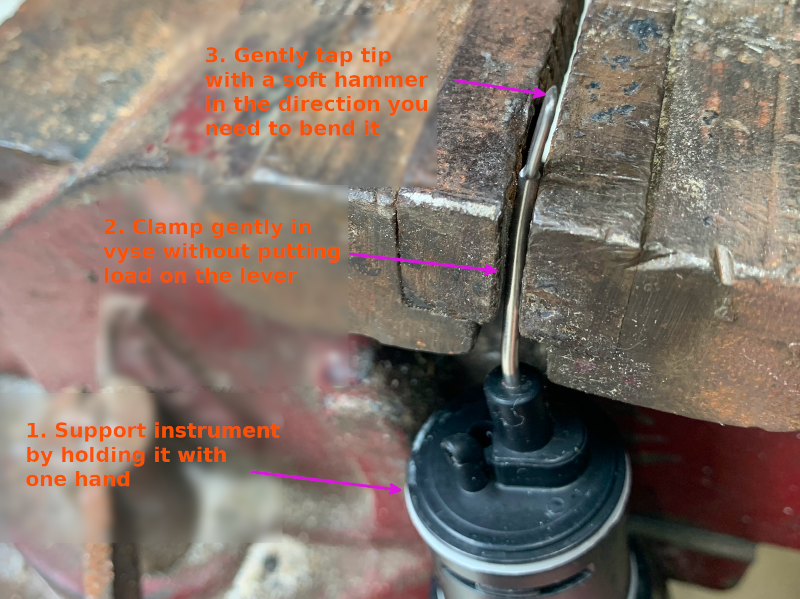
This is obviously not covered by warranty, so if you need to do this, think carefully. I needed to bend the lever tip to the right in the above photo. I bent it about 2mm. Then I did a re-calibration and the short-cut to Bite Center, and got about 40. The bite worked properly then. If the number that you get with the short-cut is somewhere in the middle of the range (maybe 20 to 50), then the lever is probably OK. If it’s outside that range, then you’ll probably have difficulty setting the bite functions. If so, then your options are a) living with it, b) taking it in for service, or c) doing the mod above.
In addition to the Bite Center, you need to set up a “Dead Band” (my name for it). As you release your bite and the reed moves away from Bite Center, you don’t want the bend down to start immediately, otherwise it would be too difficult to hit an on-key note. Here’s my procedure to do that.
First, select the scene you want to edit and open up the Aerophone Pro Editor App. I’m using an Alto Sax scene for an example
Select the <Editor> tab, and open the Scene/Common screen:
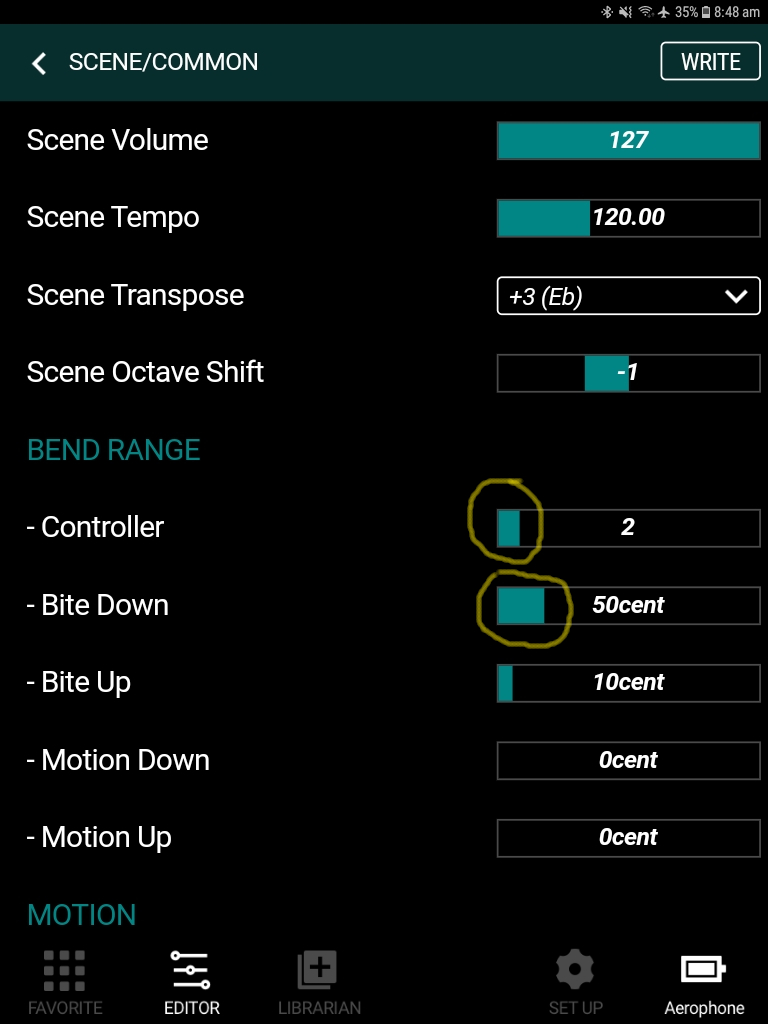
Set the Bend Range Controller to ‘2’ (the default, I think). This is used mainly for setting the output to an external synth. The max MIDI value for pitchbend is 8192, and the controller determines how much of that is sent out the MIDI port. It’s calculated like this: max value = 8192/controller-value. So, for a controller value of 2, the max value output for pitchbend would be 8192/2 = 4096. It does have some effect on the internal synth, but setting it to 2 is safe.
Set the Bend Range Bite Down value to how much you want the pitch to bend down when you release your bite. There are 100 cents in a semi-tone. A setting of 50 is OK, but it is up to you.
Now, open the Scene/Internal screen:
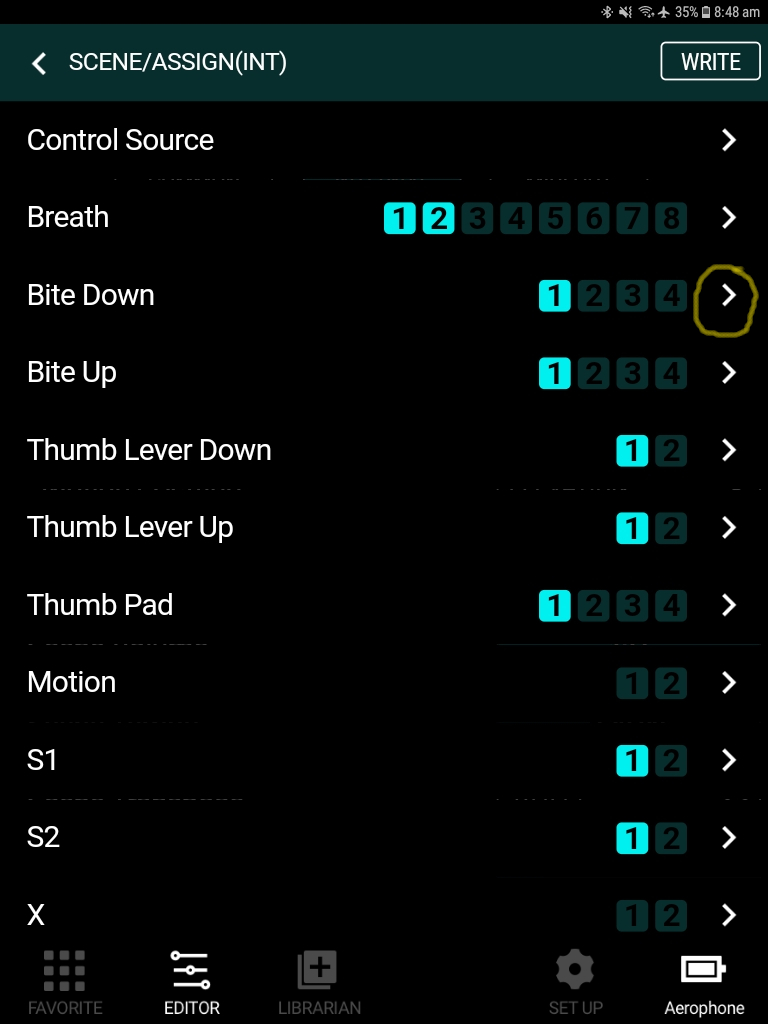
Select the little arrow next to Bite Down (note that in this example there is only one controller configured for bite down – as shown above by only the number 1 being highlighted – you can have 4 controllers)

Note that the tab at the top of the screen is on ‘1’. You can select the other tabs to set/adjust any of the other 3 controllers.
On this screen there are Input Min/Max and Output Min/Max settings. The range for all of them is the MIDI standard 0-127. What happens here is that as the reed moves away from the Bite Center when you release your bite, the value of Input increases from zero (at Bite Center) to 127 (at fully released, I think). While the value of Input is less than the Input Min setting the value of Output (i.e the bend) is Output Min. As the input increases further (i.e. you release your bite more) the Output rises until it reaches Output Max when Input is at Input Max.
On the screen above is shows that Input Min is 25 and Output Min is zero. This means that the output will stay at zero until the Input reaches 25. The is the Dead Band – reed movement that creates no change in the bend. You can adjust these settings to suit your way of playing. You need to keep the Output Min on zero, but you can tweak the others:
- Input Min – the size of the Dead Band (I use 80)
- Input Max – when max output is reached – must be bigger than Input min. The larger it is, the more of the reed movement is used to control the bend (I use 127)
- Output Min – the minimum bend – keep this on zero
- Output Max – how much of the Bend Range Bite Down setting (50 cents, or whatever you set it to previously) is used (127= all of it. I use 127)
The Curve setting changes the way the Output changes relative to the Input. There are all sorts of curve shapes here, but, because the reed movement is so small, changing them doesn’t seem to have much effect.
Here’s a diagram that may help:
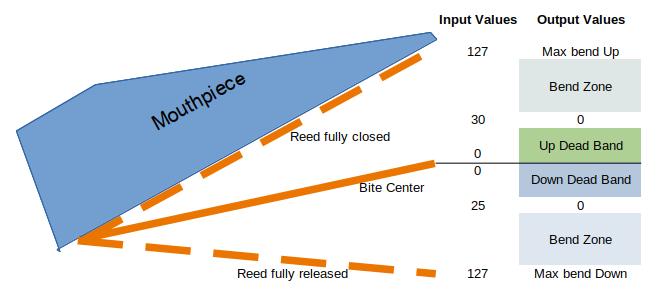
The reed angles are exaggerated, but this shows a bend down dead band finishing at an input of 25, and a bend up dead band finishing at 30.
Reed wear
I noticed after using the instrument for about 6 months that the back of the reed where the bite lever touches it was getting damaged by the lever:
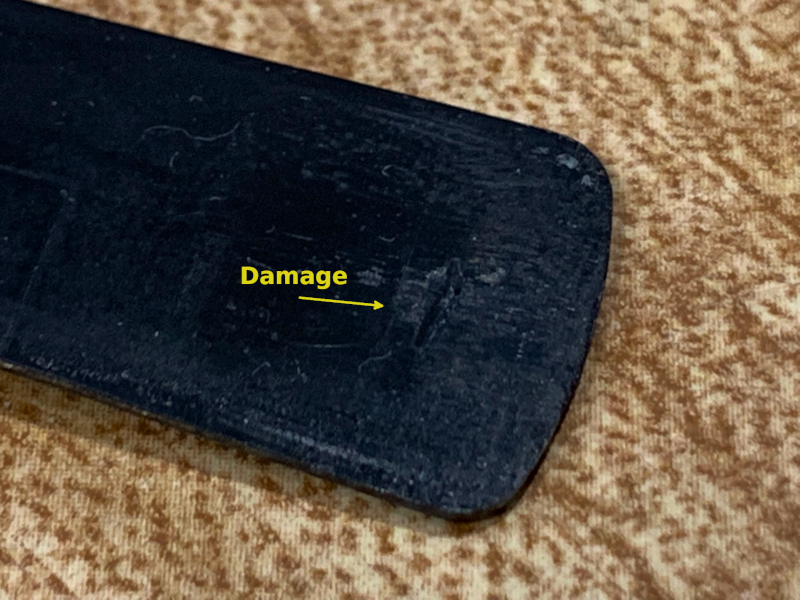
This is a problem, because you can’t just replace the reed, you have to replace the whole mouthpiece. I did this:
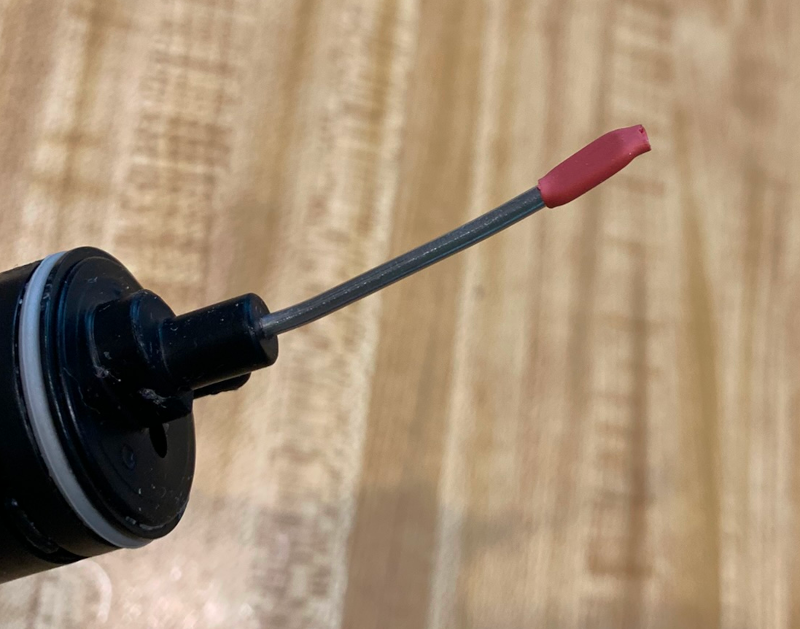
I got some electrical heat-shrink and covered the end of the lever. Hopefully the softer material won’t continue to damage the reed. Note that this damage wasn’t caused by bending the lever (as described previously) – it was there before I bent the lever.
Changing Scenes Quickly
The presets on the instrument are called “scenes”. As on the AE-10, you can arrange the scenes into your own banks. On user bank 01, the first 12 scenes are able to be selected quickly by holding (with your left thumb) one of the scene select buttons (Control Keys, No. 9 above) and then clicking one of the performance keys with your right hand. Roland call this a “shortcut”. It sounds simple enough, but in practice (for me) getting my thumb from No. 7 to No. 9 and back again is tricky if I’m in a hurry. It would have been a much better solution to use the S1/S2 keys (Control Keys, No.5 above), but although the S1 and S2 are programmable, you can’t program them to do the “shortcut”. I’ve put in a request to Roland to fix this.
In the end, I found it is much faster and more reliable to use a MIDI stomp box. You can use one to send a MIDI program change command to the AE-20 via a USB cable or via Bluetooth. Both methods work, and you can select any of the 50 scenes in each user bank (as opposed to just 12 with the “shortcut”). I built my own Bluetooth Low Energy stomp box using a NodeMCU 32s controller. It works very well and has no cables. I assume a commercial Bluetooth stomp box would be OK, but I haven’t tried one.
Control Adjustments
The control adjustments on this instrument are vast. A concept that needs to be understood is that the tweaking of the controls can either be done at a System level, or at a Scene level. Why would you want this? Well, as an example, one of the first things I tried to do was to set up the bite so that when I played flute the bite-bend didn’t work and when I played clarinet it did. To do this you need to set the Assign Source Bite to be “Scene” (default) rather than “System”. This means that all the settings for the bite-bend come from the values in the scene, not the system values. Now the tricky bit: to adjust the “Assign” values for a scene, you can’t use the menu on the instrument – that’s only for assigning values for when you use “System”. To adjust the scene assignments, you need to use the Editor App. I’m not going to go through how to do that here – it’s too involved.
Now, this same concept applies to the breath, lever, etc aspects of the instrument. There is a separate Source setting for each of these. So, for instance if you want all your scenes to respond in the same way to breath, then you’d use “System” for Assign Source Breath. This is simpler, but it has its limitations – you can assign multiple controllers to, say, breath, and you might not want all of them applying to all scenes (eg. growl, modulation, etc)