25 Dec 2024
Overview
This describes my latest MIDI wind controller. My previous MIDI devices used Teensy 3.2 processors, which are now extinct, and so I figured that if I ever had to replace the processor I could be without my instrument for a long while. I initially decided to try the Raspberry Pi Pico W as the processor, but after building the instrument and testing it I discovered that the RPi was the wrong choice. In the end I migrated the Teensy 3.2 innards of my Midi-Sax to this instrument. The reasons why the RPi wasn’t suitable are listed at the end of this page. Future upgrades will likely use the Teensy 4.0 which is available.
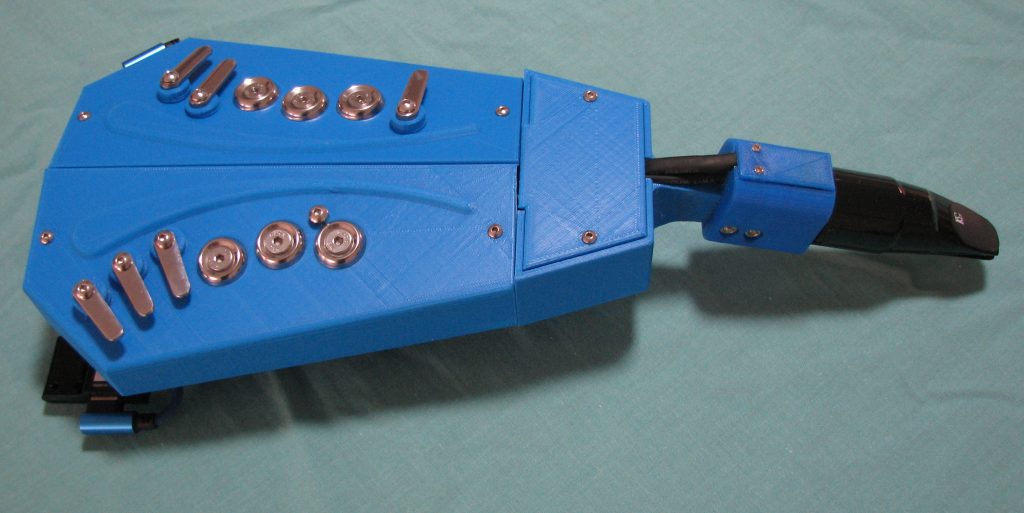
I re-used the side-by-side hand arrangement that I had tried previously. The result looks like this:

Details
The instrument has the following features:
- Compact size – 380mm long
- Low weight – 510gm (without battery)
- Teensy 3.2 processor with 2 x MPR-121 capacitor sensing boards for the keys
- 5-octave range
- Touch sensitive keys
- 128×64 OLED display
- Menu knob
- Program button (for presets)
- Reed pitchbend using Roland AE20 mouthpiece
- Portamento key
- Either USB or BLE MIDI (battery and adapter needed for that)
The body of the instrument is 3D printed in PLA+, and mouthpiece holder is printed in ABS for strength and so that it can be smoothed with acetone (hygiene).
The mouthpiece is from a Roland AE-20 and the reed and pitchbend mechanism is 3D printed in ABS.
The keys are set at an angle in two dimensions to get a comfortable feel:

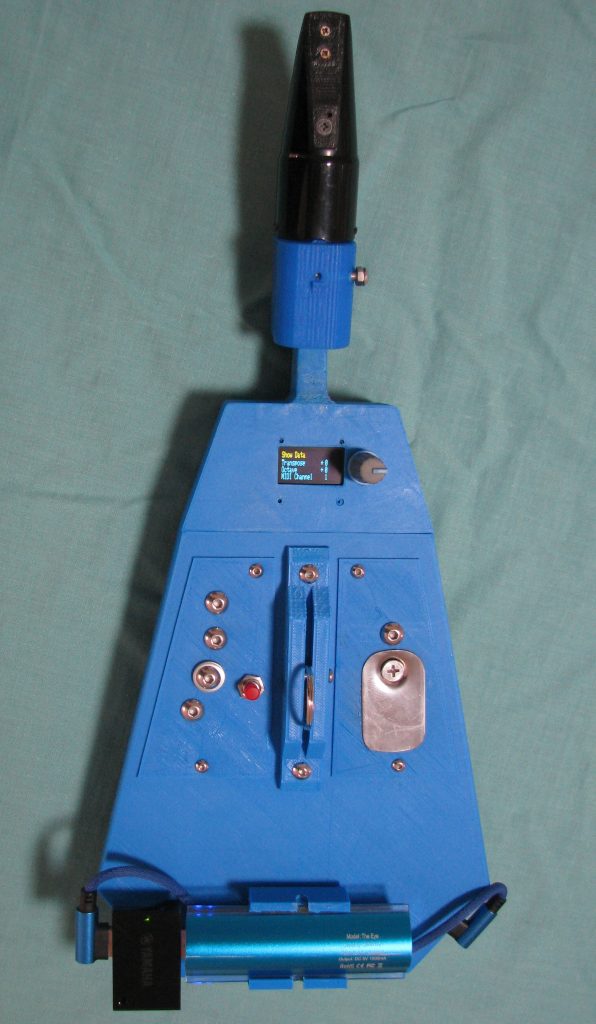
The back of the instrument (below) shows the LH thumb octave keys and (red) program key, the earthing RH thumb pad, the glide (portamento) key above the thumb pad. In the centre is the adjustable neck strap loop.

The OLED display and knob enable the settings of the instrument to be shown and adjusted.

The instrument can be connected to a synth via a USB-C cable, or via a BLE adapter. Shown here is the battery and my Yamaha UD-BT01 Bluetooth adapter. The battery provides at least 6 hrs of play time:

The photo below shows the mouthpiece holder and the mouthpiece itself. Inside the holder is the photo-cell that detects the reed movement.

The video above shows the reed action.
How does it Play?
I have now switched from the XpressO synths to SWAM instruments by AudioModeling, and this instrument performs well with them.
The biggest hurdle with this instrument is getting used to the side-by-side hand positions. The best way to approach it is not to think about it! The ability to scoop notes with the reed is very sax-like, and the touch-sensitive keys enable really fast playing.
The RPi Pico – why I’m not using it
I hadn’t used a Pico before, but it looked like it had all the requirements, so I jumped in.
I used up ALL the I/O pins because I wanted to try to get away from having to use the capacitive sensing boards. The pins I needed were:
- 18 touch-sensitive keys
- SDA and SCL for I2C
- Program button
- Encoder knob A, B and click
- Analog breath
- Analog bite
I used CircuitPython as the programming platform, as it had the modules I needed. The touch sensitive keys were easy to configure, but I discovered that they required a lot of processing time, particularly when using a lot of fingers. The program scans the keys on each cycle and it was taking about 12msec with no fingers applied to around 23msec with all fingers down. This is clearly too much for fast keying. The solution I found was to overclock the processor from125MHz to 260MHz. This was fairly simple to do, and it dropped the all-fingers-down time to around 13msec, which is really not fast enough, but workable. I’ve ran checks on the processor temperature (there’s an in-built sensor) and even with the overclocking it ran cool.
However, the high use of processing time (for the touch keys) meant that the response to the breath pressure was slow. This was the killer problem. The instrument worked, but I couldn’t tongue fast.
In addition to this issue, the RPI doesn’t have EEPROM ability, which is needed to store settings between boot-ups. I should have checked this when I selected the chip, but I thought I could use the USB drive function. That turned out to be difficult.
I initially chose a Pico W model with the BLE and Wifi capabilities. I was hoping to be able to get MIDI over BLE sent out by the chip, but I soon discovered that the code for BLE MIDI is not ready yet. I had to use the Yamaha adapter. That in itself presented problems as I found I had to build in a 0.5 sec delay on start-up before any python modules are loaded. If there was no delay, the USB interface didn’t come up cleanly and many modules wouldn’t load. I reverted to using a Pico (not W model)
The SSD1306 display has limited font files using CircuitPython. I’m using a 8×5, and it is pretty small. I couldn’t find any other font files that worked.
The only real redeeming feature of the RPI was that it used less power than the Teensy. Even with the overclocking it pulled about 440mA. For comparison, my EWI-USB draws about 580mA, and my Midi-Sax (Teensy 3.2 + other processors) draws 720mA.
Technical Stuff
Components:
- Processor – Teensy 3.2
- Capacitive sensor boards MPR-121 x 2
- Display – SSD-1306
- Reed movement detector (optical sensor) – QRD1114
- Pressure sensor – Honeywell ABPLLND060MGAA3
Why is it called “e-WB”?
I didn’t have a name for the instrument when I first brought it along to band rehearsal. The band director said, “it looks like a hot-water-bottle”. Thanks.
Update History
25 April 2024 – changed to Teensy 3.2
11 Apr 2024 – changed pressure sensor
29 Mar 2024 – original post