Akai EWI-USB with Raspberry-Pi Router and Roland Synth
Updated November 2019
This project was completed in Feb 2017. I have since replaced the synth with a DynaSample XpressO, and the system is no longer in operation. The information is kept here to help others who might be interested.
After having played recorder, clarinet and alto sax for a number of years at an amateur level, I bought a Akai Professional EWI-USB in June 2015. My musical skills are not good, but I enjoy playing. I find it annoying that when I pick up the clarinet or sax without having played it for a while, my tone quality is poor until I get my mouth into shape, but by then I’ve usually given up. Also, playing in tune with anything else is tricky as the instruments are either Bb or Eb. The EWI promised good sounds from the word go, and the ability to easily tune to other keys. The price at around A$400 was very attractive. The immediate problem with it is that it needs a computer to run, and then there’s the start-up time, and configuration, etc, etc. It’s not something that you can just quickly plug and play.
So, the objective was to create a EWI that was portable, quick-starting, but also something that could be connected to a larger sound system and something that could be configured easily.
What I’ve built is a system that:
-
- is small, cheap, and flexible
-
- uses a headless Raspberry-Pi 2 as the router
-
- connects to the EWI-USB either with a USB cable or a Yamaha UD-BT01 Bluetooth dongle
-
- is ready to play in 30 seconds
-
- is powered by a Ozito 18V 3.0Ah rechargeable drill battery
-
- has a Sony SRS-X2 rechargeable speaker
-
- has a Sandisk Ultra 8G micro SD card
-
- uses a Roland JV-1010 as a synthesier
-
- uses a Patchman wind controller soundbank (Vol 2)
-
- can be configured using a Wi-Fi enabled tablet or mobile phone (I used an old Android tablet)
-
- has 4 presets (optionally using GPIO buttons) for quickly configuring the EWI
-
- can fine-tune the synth in order to be able to play with non-electronic instruments e.g. recorders (as purchased, the USB version of the EWI doesn’t have this facility)
- is FUN to play – the most important!
Credits
http://ewiusb.com – for information about how to talk to the EWI-USB
http://ewiusb.com/downloads/ewiUSBSysExNRPN.pdf – a summary of the commands
Cautions
This project is not for the faint-hearted. The scripts here are not plug-and-play. They will require tinkering to make them work on your system. If you’re familiar with the Linux command line, it’s likely you will be able to make it all work.
Key Concepts
Software
All the functions have been set up using standard Raspbian software. Programs have been written as Python, Bash, and PHP scripts using a standard text editor.
Latency
This is always raised as an issue – it’s the delay between trying to make a sound and the sound appearing out the speakers. Because computers are not real-time processors, you can never tell when a delay is going to occur. It can be due to the operating system having to do housekeeping, or whatever. That said, it hasn’t been a problem for me with the RPi – maybe because it’s playing only one note at a time? I’ve intentionally not run a graphical user interface to keep the load down, but other than that it’s pretty stock-standard Raspbian (the RPi’s native OS).
NOTE Feb ’16: I did some testing using microphones and the latency is somewhere around 45msec before the “ramp up” of the sample envelope. I tested my (real) clarinet too, and that seemed to be around 60msec.
NOTE Apr ’16: I discovered that having an ethernet cable connected to the RPi creates significant latency. I’m not sure why it occurs, but if you are planning to use an ethernet connection to configure the EWI-PI, then you il probably need to unplug the cable when you are playing. It doesn’t occur if you are using wifi.
NOTE Jun ’16: I configured the system to use a Bluetooth connection to the EWI-USB. This was a potential addition to the latency, but after tinkering with the parameters, it is on a par with the direct cable connection. I certainly don’t notice any problems when I am playing.
NOTE Nov ’16: When using the Yamaha UD-BT01 MIDI adapter, the latency is OK, but it can be improved by re-compiling the R-Pi kernel. It produces a small but noticeable improvement in the response (jitter reduction). The instructions for doing so are included here, but re-compiling the kernel is not something you do lightly – it requires some Linux skills. The hard work to evaluate this aspect was done by my German colleague Petra Roosen.
Control
I opted for control using Wi-Fi. The RPi is set up as a Wi-Fi hotspot, and I log in using an old Android tablet (you can use any smartphone too). The control screen is provided by the Apache web-server, and it gives control over both the EWI’s settings, and the settings of the synthesiser. On start-up the RPi will return to the settings it had last time it was running. The system can be run simply as a black box – you don’t need the WiFi connection unless you want to change something. It can also be run without the WiFi, just using an wired ethernet connection to configure it, but it’s not as convenient.
In addition to the above, I added four “Preset” buttons connected to the R-Pi GPIO pins. They allow you to change very quickly from one EWI config to another. I needed it for changing the transposition when playing with a piano. Some of the music I had was in Eb and some in C, so when switching to the next item it was very convenient to just click a button and 3 seconds later the key change was complete. This is an optional item which requires some electronic construction skills. You still need the web interface to initially set the presets.
Sound
I originally used FluidSynth and a sound card to generate audio. Then I discovered the Patchman sound banks, and bought a secondhand Roland synth. The Patchman sounds are much better than I had on the (free) FluidSynth soundfonts. I probably could have eventually tweaked the FS stuff to get a good result, but I opted for the Patchman solution. Output is to the Sony battery operated speaker that produces about as much volume as a normal clarinet.
MIDI
USB Connection: The EWI is plug-and-play with Raspbian. It is seen by the OS as a MIDI port, from which the MIDI commands come. The MIDI routing is controlled by a Python routing program that is configurable from the WIFI interface.
Bluetooth Connection: The EWI USB port is plugged into a Yamaha UD-BT01 Bluetooth MIDI adapter, and the adapter is plugged into a rechargeable battery. A separate USB Bluetooth adapter is plugged into the RPi. The MIDI routing is controlled by a Python routing program that is configurable from the WIFI interface.
Details
Hardware
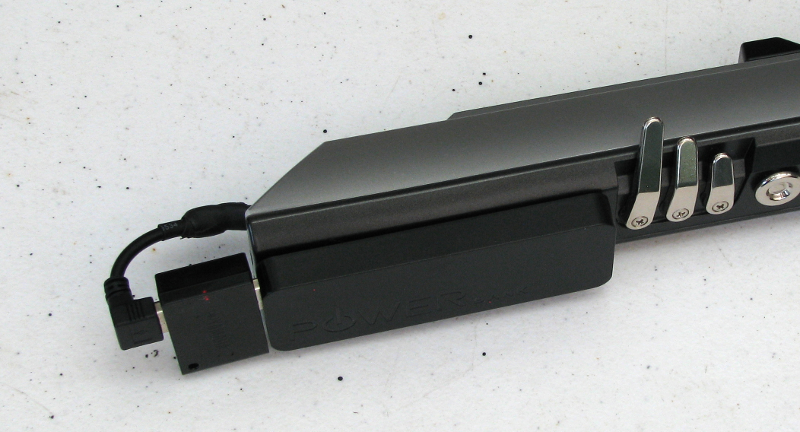
The above photo shows the slim battery (5600mAh, 5.0V) and Yamaha adapter attached to the EWI-USB. It’s held on with Velcro. You only need this if you don’t want to use the standard USB cable
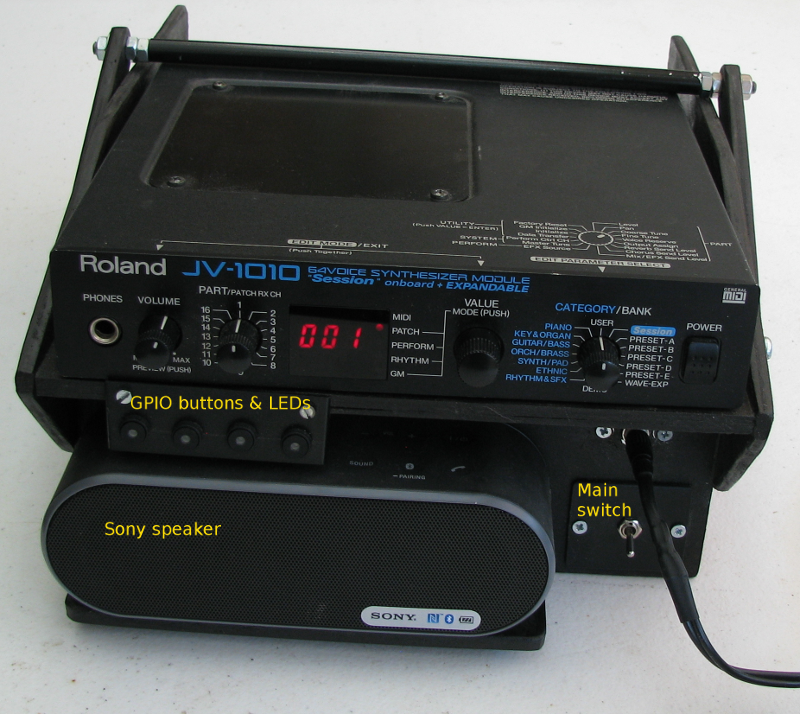
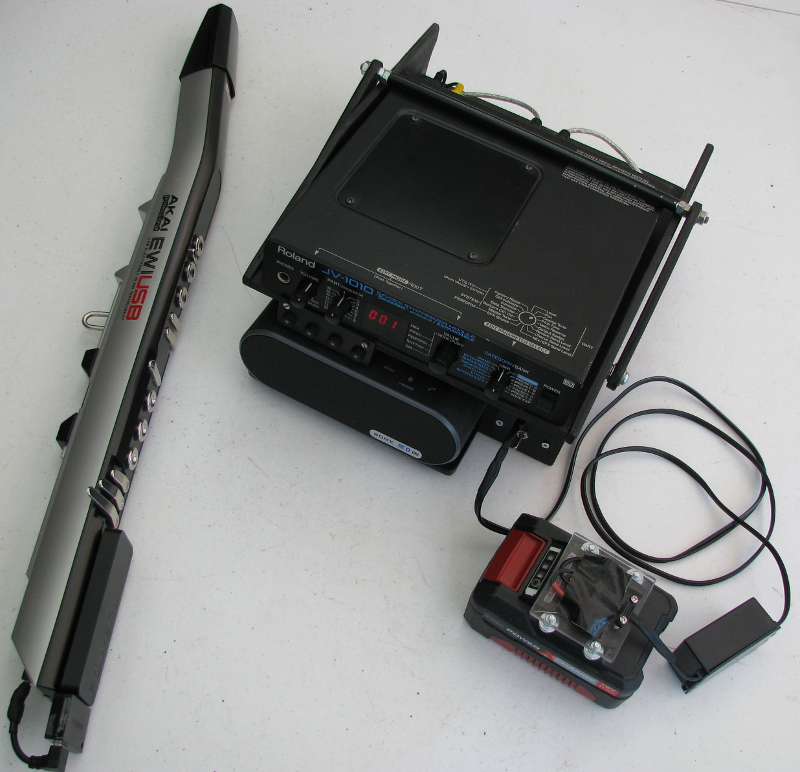
The photo above shows the frame that holds the Roland synth, the speaker, the R-Pi, the GPIO preset buttons, and the power supplies.
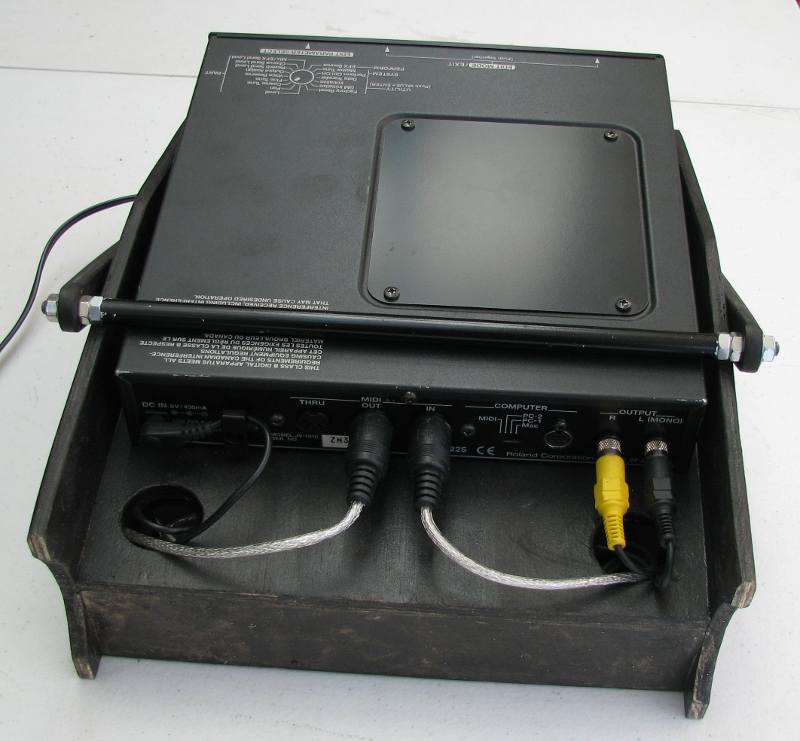
The photo above shows the rear of the unit. The MIDI out cable is not required to be plugged in, but the USB-MIDI adapter had one and I needed to put it somewhere…
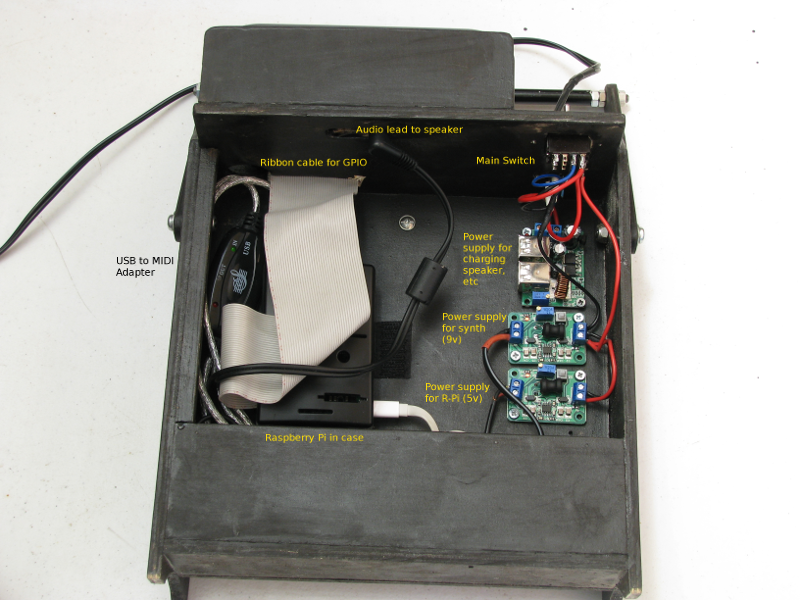
The photo above shows the underside of the unit with the power supplies and R-Pi. The system is designed to run on the battery. I chose a 18V drill battery, as they provide the best “bang-for-buck”. I had to use step-down power supplies for the R-pi (5V) and the Roland (9V). I also added a power supply for charging the speaker, EWI battery, Android tablet, etc when the unit is switched off. The system can run for hours on a single charge (I haven’t tested how long).
Sound configuration
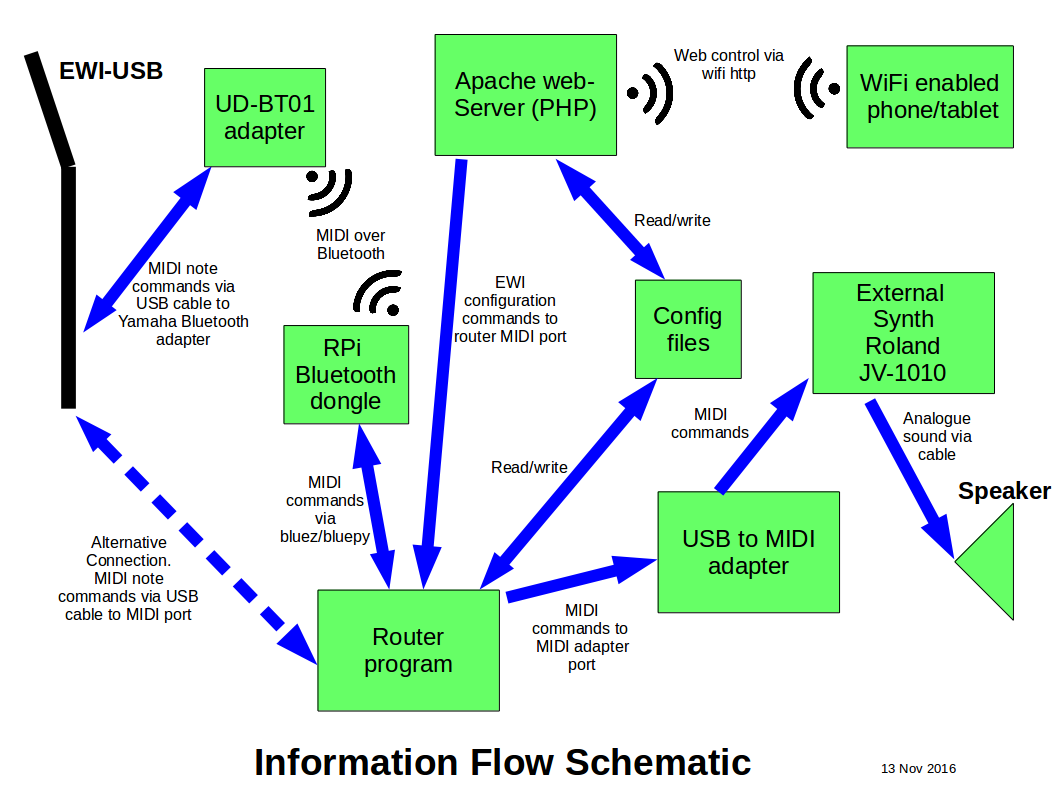
The sound configuration is set up make the following information flows possible
The Sony battery-operated speaker (like many others) has a Bluetooth function, but I opted for a cable connection. My reasons are: a) the Bluetooth probably introduces more latency (I don’t know how much), b) I’ve found Bluetooth connections to be “fussy”. The last thing you want when you’re performing is to have the Bluetooth fail to connect. c) the cable connection enables you to plug into any sound system.
Talking to the EWI-USB
A full discussion about the technicalities of talking to the EWI-USB is available on http://ewiusb.com/sysex_page1/ . This system uses that information and works like this:
-
- The settings are read from the EWI and are displayed on the Apache web page each time it is refreshed.
-
- When the web page is submitted (“Save to EWI”), a handler PHP script extracts the settings, converts them to hexadecimal, and saves them to a text file. It also saves the non-EWI settings that are needed for the synth and the router.
-
- The handler PHP script then runs a bash script to send the commands to the EWI via the router
- When you get settings for the EWI that you like, you can save them as “defaults”. Only the settings that go to the EWI are saved as defaults (i.e. not the router or synth settings).
The web interface looks a bit “large and chunky” on a normal computer screen, but it is designed for use on a 7″ tablet, where you have to use your fingers rather than a mouse. It has a header (always visible) and five tabs:
The Performance tab. It contains the settings that you are most likely to adjust when playing:
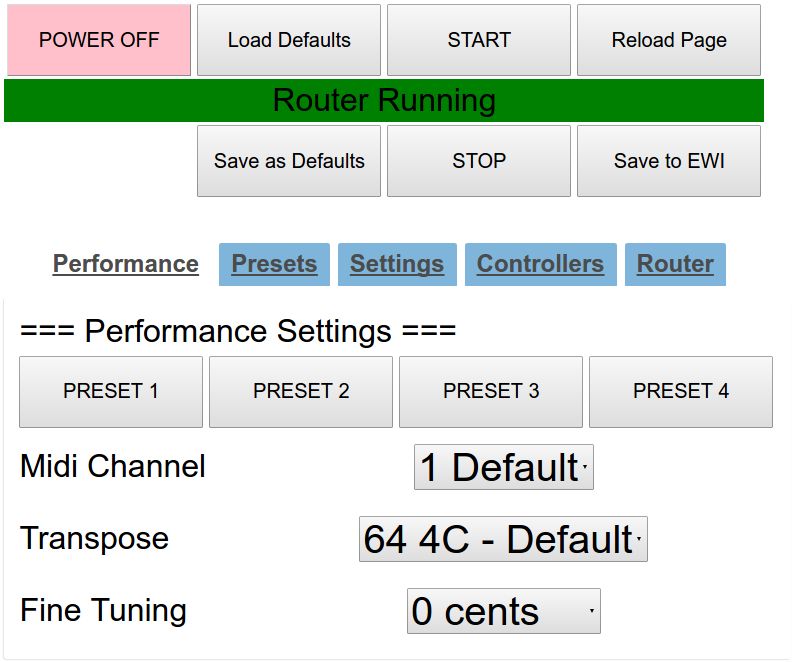
-
- Presets can be activated from the web interface or from (optional) GPIO Preset buttons.
-
- The MIDI channel number you use depends on what system you have. The numbers used here go from 1-16, but channels 0-15 are actually what the MIDI commands send. Most synths and other devices call their channels 1-16, so that’s what is shown here.
-
- The selection of the key that the EWI is going to play in is set on the EWI itself, not the synth.
- The Fine Tuning commands go from -50 to +50 cents and the commands are sent to the attached synth (not to the EWI).
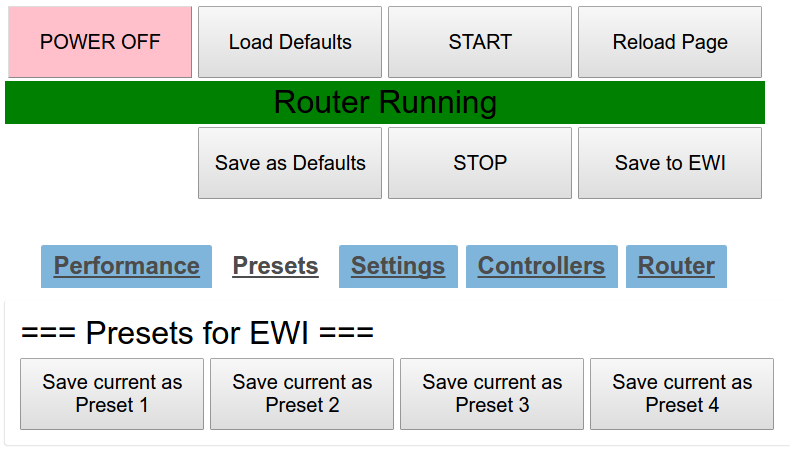
The Presets tab. It enables you to set four presets for the GPIO buttons:
The Settings tab. It contains the settings for tweaking the EWI-USB:
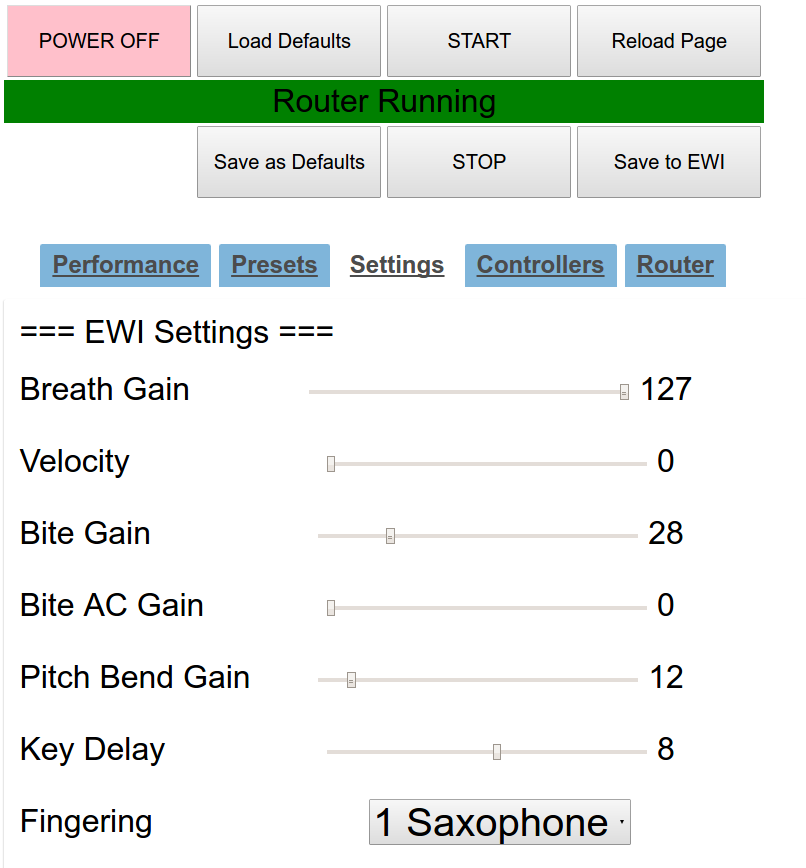
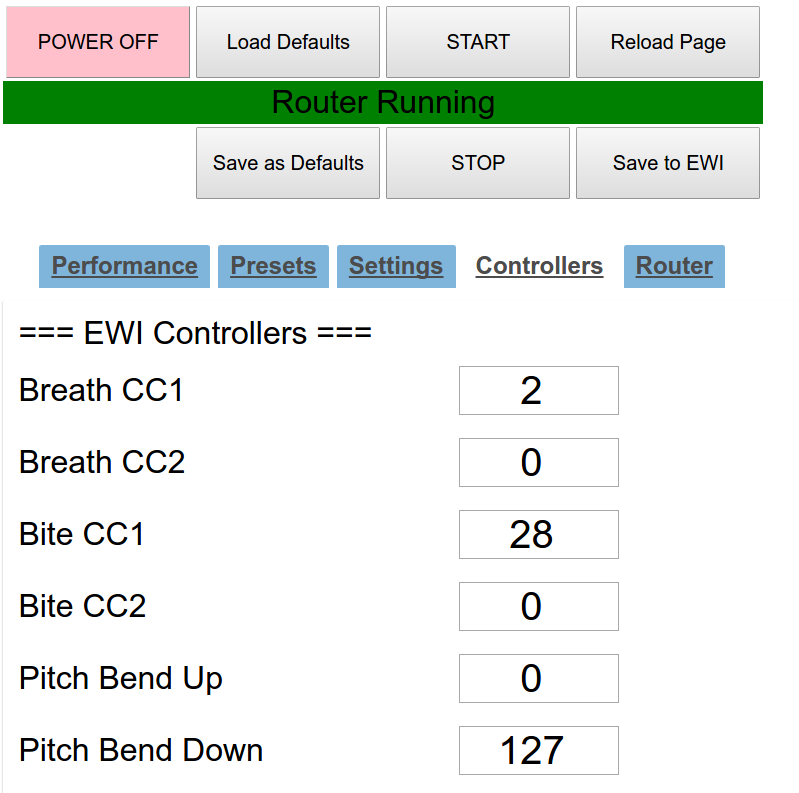
The Controllers tab. It contains the settings for the EWI’s MIDI continuous controllers (CCs). Note that the Patchman sound banks alter the synth so that it responds to CC2 (breath controller) for volume. If you are using a synth that doesn’t respond to CC2, you will have to use CC11 (expression) – change the Breath CC1 setting appropriately.
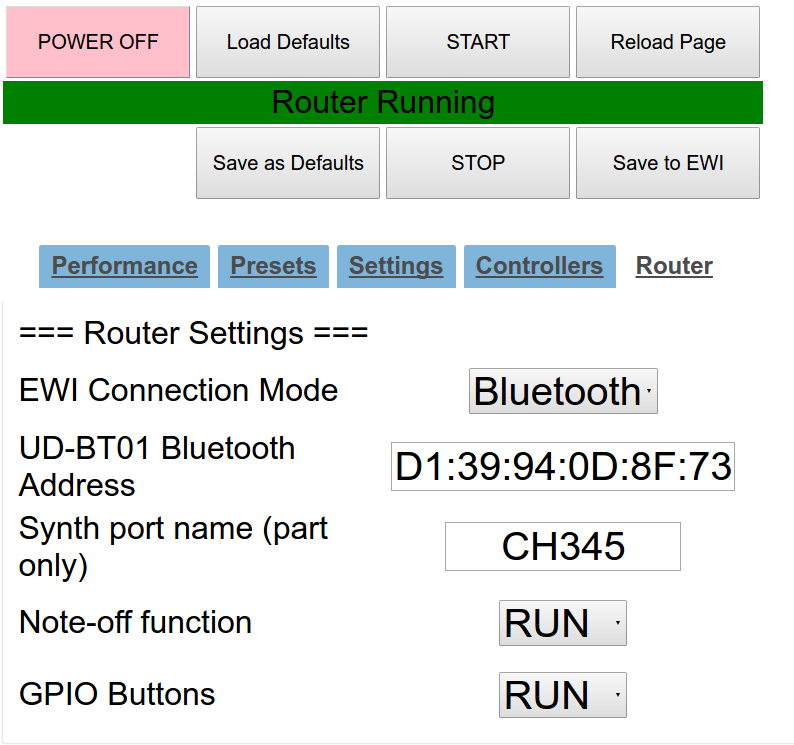
The Router tab. It contains the settings for running the MIDI router:
Using the EWI-PI and Web Interface
Refer to the relevant screenshots of the web interface above
Within 30 seconds of powering-up the EWI-PI, the web interface should be available. You will need to know the IP address of the RPi to access it. I have made the RPi as a hotspot, and so it always has the same IP address (192.168.41.1, as configured via hostapd – see the Adafruit page mentioned above). I load http://192.168.41.1/ewi into the browser. You’ll have to use whatever address you have, e.g. http://[your address here]/ewi
If you forgot to plug in your EWI prior to power-up, it’s OK, the program will wait until you plug it in to start the router. If the EWI becomes unplugged during use, you’ll have to reconnect it, the system will recover in a few seconds.
The system remembers its condition for the next power-up, so if the router was running when you powered-down, it will restart on power-up. The reverse is true.
The <Reload Page> button queries the EWI to see what settings it has. The router needs to be RUNNING to be able to query the EWI. If the router is stopped, you will get zeros in a lot of the settings boxes.
The <Save to EWI> button sends the settings shown on the screen to the EWI. The settings aren’t sent until you hit the save button. There is minimal error checking for those settings, so you need to think a bit. The <Load Defaults> button sends a set of pre-saved settings to the EWI. When you have found the settings you like, you can save them as defaults using the <Save as Defaults> button, then next time you stuff up the settings and can’t remember what the good ones were, you can simply load your defaults again.
The settings shown above are the settings I find comfortable. I’m not going to discuss them all here – I’ve covered the ones that are special for the EWI-PI.
Stuck Notes
The EWI-USB occasionally produces “stuck notes”. This is where the synth doesn’t receive a “note_off” command for a particular note, and so that note continues to be played IN ADDITION to whatever subsequent note you play. It seems to be a general problem and could be a result of the EWI malfunctioning or the command being lost in the computer. I have implemented a workaround that monitors the incoming commands from the EWI and each time there is a new “note_on” command it sends an additional “note_off” command for the previous note to the synth. Of course this only works because the EWI is supposed to play only one note at a time. You can turn this feature on and off via the Router tab on the web interface.
I have referred to “note_on” and “note_off” above because they are the MIDI standard. In fact, the EWI-USB actually sends only “note_on” commands. Instead of “note_off” it sends a “note_on” with a velocity of zero. The synth interprets these as “note_off”, and it doesn’t care if it receives a “note_off” command for a note that has already been cancelled.
Running the Router
The whole system is started by a cron job on boot, and there is a Bash script that regularly checks a status file that is set by the web server. This file tells the script to either run or stop the router. This is useful for making changes to the configuration and re-loading without re-booting. Normally, you just leave the router running.
To configure the router, you need to know a) the Bluetooth address of the Yamaha UD-BT01 adapter (if you are using one) and b) the name of the USB to MIDI adapter port. How to do this is described in the HOWTO document. After entering the values you need to STOP and START the system using the buttons on the web interface.
Configuring the R-Pi as a Hot-Spot
This is well covered in Adafruit’s “setting up a Raspberry Pi as a WiFi access point”. I used a Realtek RTL8188CUS low profile wireless adapter (readily available on-line) – they have limited range, but that’s not an issue when you’re sitting next to the computer.
If you’re using a RPi3, which has it’s own wifi adapter built-in, then I’m advised by users that this link works.
GPIO Preset Buttons
I’m not going to go through how to do things with the R-Pi GPIO pins. There is a wealth of information out there… I’ll just include a small circuit diagram to show a button and its corresponding LED:
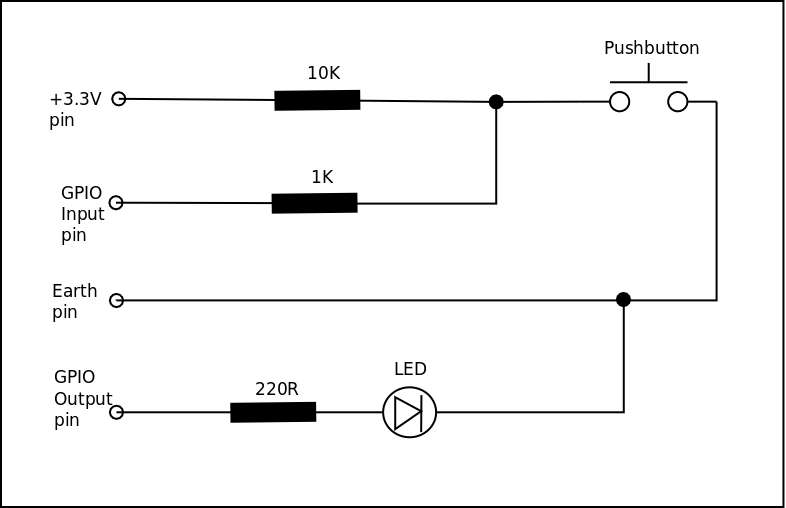
I used a header plug and ribbon cable to connect to the R-Pi, and I used buttons with LEDs built-in.
The buttons work like this:
- you click the button you want, and the router program blinks all 4 LEDs on to acknowledge that it has received the command, and you release the button
- the router sends the commands to the EWI
- the router reads the (hopefully changed) EWI config
- the router compares the EWI config with the presets and if it matches one, it lights the associated LED telling you that the change was successful
- if you press button 1 and button 4 at the same time, the router turns on all LEDs and initiates a shutdown. All LEDs go off when the R-Pi is shut down, then you can power off.
You will have to change the router.py program for the GPIO inputs and outputs you have chosen. You will need to edit that file (in the scripts directory), changing lines 45 and 46 to whatever GPIO pin numbers you have chosen:
GINPUTS = [4, 17, 22, 10] # these are the inputs in order as wired
GOUTPUTS = [18, 23, 25, 24] # these are the outputs in order as wired
Files
Project files are here
and HOWTO document is here. This works on both RPi-2 and RPi-3, as tested 7 Feb 2017.
Re-compiling the R-Pi Kernel
A HOWTO for the kernel is here. This has only been tested with a RPi-2
Firmware
I recently had a problem with the EWI when it powered up. It would not remember the last settings it had, and would load a completely different configuration. I solved the problem by re-loading the firmware – the instructions are in the EWI manual. The problem was finding the firmware – it’s not on the AkaiPro site, so I’ve put a copy here:
Update history
2017-02-07
- Tested on RPi-3
2017-01-15
- fixed a problem with GPIO buttons
2016-12-30
- added links to the files and HOWTOs
2016-11-28 Version 3
- Removed Fluidsynth functionality
- Removed Reverb and Chorus effects
- Removed the sound card
- Added the Roland synth
- Added GPIO preset buttons
- Simplified the system for “router-only” operation
2016-06-11
- Reverb and chorus effects (with tab)
- Sliders for adjustable controls
- RPi3 wifi link
- Soundfont with chorus and reverb activated on trumpet and sax
- Improved communication with EWI
- Some bugs in Bluetooth fixed
2016-06-06 Version 2
- Added bluetooth functionality
- Added the ability to use as a router only
- Added the tabbed interface
- Routing all done by separate Python program
2016-05-05 Version 1
- First serious version
- USB only
- ALSA routing
Help
I’m happy to answer queries about the project – just use the contact page